This section describes how the derived operators can be applied to your data using the OpendTect plug-in. Application of the operators can be done in various ways. Please refer to OpendTect documentation for full details. For the purpose of this document, we will only describe a couple of the mechanisms which you could use. Now, depending on whether you wish to run a test or whether you want to process a complete volume or sub-volume read the respective sub-section below. Running a test first is a good idea as you will have the opportunity to quickly view the result of applying your operators to a sample inline or xline before applying the operator to the entire 3D volume.
This is best achieved via the OpendTect "Attribute Set" dialog. If you haven't closed the "Attribute Set" dialog used to launch the application plugin, then it should still be somewhere on your desktop (possibly hidden behind other windows). At this stage you will need to select the operator to use. You should see that the desired operator has been automatically selected in the Input Wavelet field. If not automatically selected or you require a different operator then click the push button to the right of Input Wavelet label which will pop up a dialog with a list of available wavelets. This list will include both the Low End operator (suffix _lo) and the High End operator (suffix _hi). Both these wavelets were saved during the Frequency Shaping analysis and design. From the list, select the operator you want to use.
The final step before running your test will be to give your attribute a name via the input field to the right of Attribute name label and click the button. This is a very useful QC tool which will allow you to view the results of applying the derived operator to your data before committing to processing multiple 3D inlines (sub-volume) or the entire 3D seismic volume.
There are two ways of doing this:
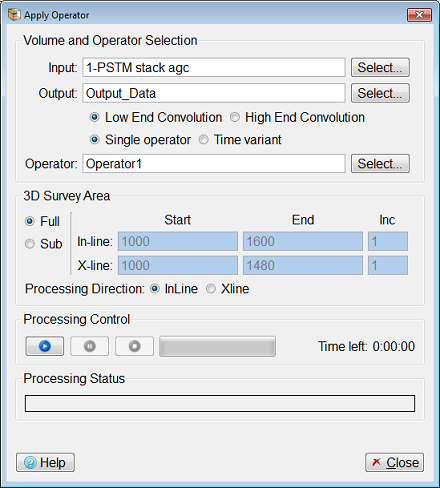
The picture below is specifically for the OpendTect plugin variant.
The "Apply Operator" dialog is modal which prevents any other application task being performed whist this dialog is open. The table below describes in greater detail the steps to apply the operator.
Select an input seismic volume. This step is initiated by clicking the push button to the right of the Input field. This action pops up another dialog which enables you to select the input volume from the current seismic database.
or
Select an input SEGY file. This step is initiated by clicking the push button to the right of the Input field. This action pops up a file selector dialog which allows you to choose a SEGY file from the file system.
Select an output seismic volume. This step is initiated by clicking the push button to the right of the Output field. This action pops up a separate dialog which enables you to select an existing output seismic volume.
or
Create a new output seismic volume. This step is initiated by clicking the push button to the right of the Output field. This action pops up a separate dialog which will enable you to create a new empty seismic volume. If this push button is labelled then a file selector dialog pops up allowing you to select a SEGY file to overwrite or to input a new SEGY file to create.
Select Low End operator or High End radio button based on the operator you wish to apply on the seismic data. If Low End Operator is checked then you can only select operators with the suffix _lo. If High End Operator is checked then you can only select operators with the suffix _hi.
Check Single operator or Time variant radio button based on the operator you wish to apply on the seismic data. If Single operator radio button is checked then you can select an operator as mentioned in Step-5. If Time variant radio button is checked then operator zones configured in Time Variant dialog is applied on the seismic data and proceed to Step-6.
If Single Operator was selected:
Select the operator from database, which can be done by clicking the push button to the right of the Operator field. This action pops up a separate dialog which enables you to select an operator stored in the database.
or
Select the operator from an ASCII file, which can be done by clicking the push button to the right of the Operator field. This action pops up a file selector dialog allowing you to traverse the file system to choose an operator from a previously exported operator in an ASCII file.
Specify the area limits of the 3D survey to be processed and the processing direction (inline or xline).
Apply the operator by clicking the Processing Control button.
The "Processing Control" block within the "Apply Operator" dialog allows you start, pause or stop the processing. The image in the figure above shows the "Apply Operator" dialog after the processing has been started.
Start Processing: This icon is clicked to start the processing. When you click the start processing icon an additional dialog will appear to prompt you to confirm that you wish to proceed with processing. Here you have the opportunity to confirm as some jobs run for a long time and will overwrite the output volume.
Pause Processing: This icon is clicked to pause the processing.
Stop Processing: This icon is clicked to stop the processing.
Processing Progress and Time remaining: To the right of the processing controls is a processing progress bar which shows the percentage complete. To the right of this is the time left in hours, minutes and seconds.
Monitor the status of the processing.
Application of the operators is achieved via the OpendTect attribute processing facility (see OpendTect documentation chapter 5 for details of how to do this). In brief, this can be achieved by either clicking the menu item or clicking the  icon within the OpendTect main window. This will pop up the "Process" dialog.
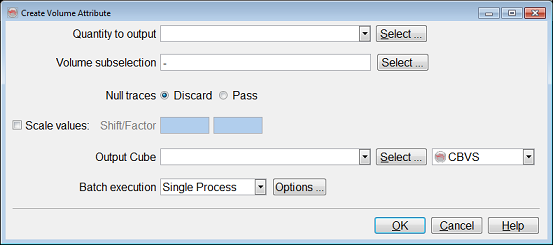
The list below describes how you specify the various parameters to the Process controller to Create a Low End or High End output.
Quantity to Output
Clicking the push button to the right of the "Quantity to output" label allows you to select the named attribute to be used in the processing. The named attribute should be the attribute you added as new in section "Testing the operators". The named attribute knows: the type of attribute/process (in this case Frequency Shaping), the input data and the input wavelet to be applied.
Volume subselection
Clicking the push button to the right of the "Volume subselection" label allows you to specify whether you wish to process the entire input volume or a sub-volume.
Output Cube
Clicking the push button to the right of the "Output Cube" label allows you to select an existing cube to be overwritten or to specify a new cube to be created.
Submit to
Click the radio button to submit this processing job to a single machine. Details of using Single or Multiple machines can be found in the OpendTect documentation.
Store processing specification as
Recommend that you accept the default. All other parameters on this dialog can be ignored.
Proceed
Click the push button to start the batch processing within OpendTect.
The picture below is specifically for the OpenWorks connected variant.
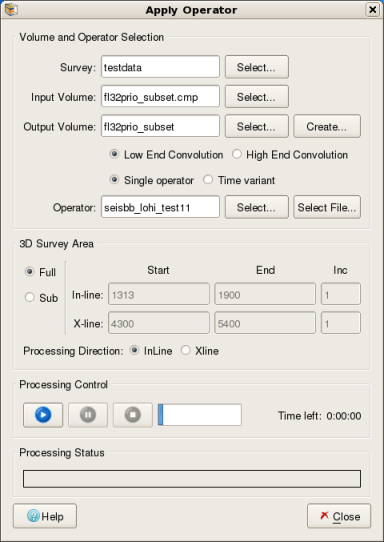
The majority of the description for this window is the same as for the OpendTect variant described above, however there are some extra buttons which are described here.
If not already selected a Survey should be selected. If the output is required to be written to a new volume then it needs to be created first using the Create... button. Operators can either be selected from the OpenWorks database (using the Select... button) or from an ASCII file (using the Select File... button).
For more detail on applying the operator see, in the User Manual, the section Apply Operator Dialog (OpenWorks connected variant).
The derived operators (lo and hi or ci and sb) can be applied to your data using either Frequency Shaping process dialog within the Petrel software or via the Petrel workflow manager.
For more detail on applying the operator see, in the User Manual, the section Apply Operator Dialog (Plug-in for Petrel variant).